
In order to run symdiag in silent mode first, you need to create a self-extracting file. You can use 7zip or Winzip (paid version). If you wish to use 7zip, please follow the below steps:
Step 1 – Set up your installation folder
To make this easy create a folder c:\SymDiag. This is where we will copy all the required files.
Step 2 – 7Zip your installers
- Go to the folder that has your .msi and your setup.exe
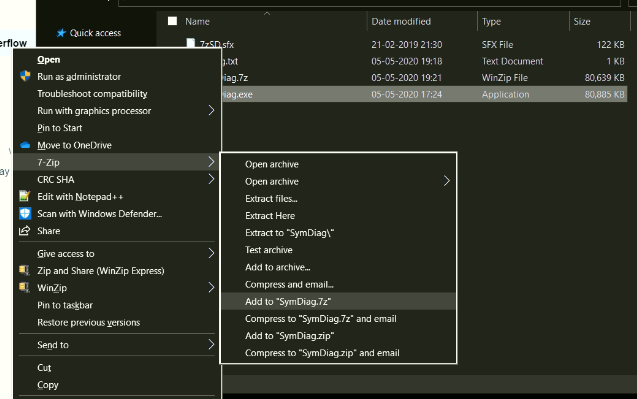
- Select the downloaded symdiag.exe
- Right-Click and choose 7Zip –> “Add to Archive”
- Name your archive “symdiag.7z” (or a name of your choice)
- Click Ok
- You should now have “Symdiag.7z”.
- Copy this .7z file to your c:\Install directory
Step 3 – Get the 7z-Extra SFX extension module
You need to download 7zSD.sfx
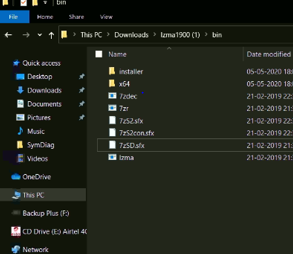
- Download one of the LZMA packages from here
- Extract the package and find sfxin the bin folder.
- Copy the file “7zSD.sfx” to c:\SymDiag
- In the same folder find Install and copy to config file to c:\symdiag
Step 4 – Setup your config.txt
I would recommend using NotePad++ to edit this text file as you will need to encode in UTF-8, the following instructions are using notepad++.
- Using windows explorer go to c:\SymDiag and select the config file.
- right-click and choose “Edit with NotePad++
- Click the “Encoding Menu” and choose “Encode in UTF-8”
- Enter something like this:
- Save the file.

CheckPoint
You should now have a folder “c:\Install” with the following 3 files:
- 7z
- sfx
- txt
Step 5 – Create the archive
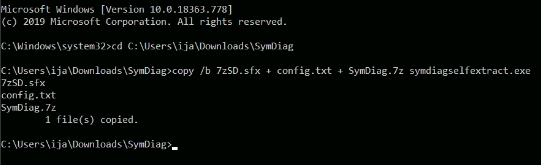
- Open a cmd window, Window + R –> cmd –> press enter
- In the command window type the following
- cd \
- cd Symdiag
- copy /b 7zSD.sfx + config.txt + SymDiag.7z Symdiagselfextract.exe
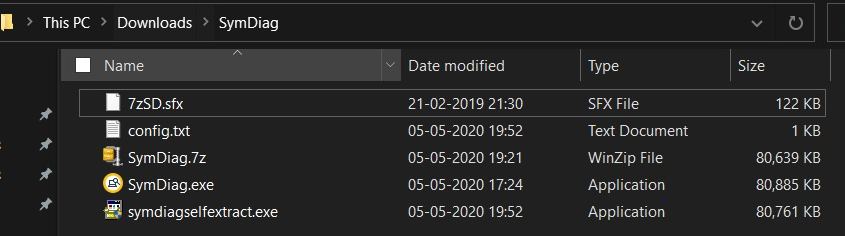
- Look in c:\Install and you will now see you have a Symdiagselfextract.exe
The Self-extracting file is created now.
Deploy SymDiag:
- In the SEPM, under the Common Tasks drop-down in the upper-right corner, select Install protection client to computers.
The Client Deployment Wizard opens. - Select Existing Package Deployment.
- Click Browse, and navigate to the SymDiag self-extracting executable archive.
- Click Next. The SymDiag deployment package will begin uploading.
- On the Computer Selection screen, in the left pane, select the computers you want to run SymDiag on.
Enter the correct login credentials if requested. Computers are added after login credentials are verified and connections to the computers are successful. - Once computers have been added to the right pane, click Next.
- In the Install Symantec Endpoint Protection Client screen, review the list of computers you want to deploy to, and click Send.
- Once the package has been deployed, you can review the Deployment Summary.
Successful deployment is not an indication that SymDiag ran successfully, only that SymDiag was successfully copied to the machine and launched. Once the package has been created you can copy it from the destination c:\sdbzfile23
Refer links:
https://knowledge.broadcom.com/external/article/181445/deploy-symdiag-using-the-client-deployme.html
https://knowledge.broadcom.com/external/article?legacyId=TECH170732
